Hi, let’s disable Enable Disable Sleeping Tabs Timeout in Edge Browser using the Microsoft 365 Admin Center policy. As you all know, the sleeping tab is one of Microsoft Edge’s essential features. With this feature, users can improve their browsing experience by improving browser efficiency.
This is the best option for freezing a tab or reducing resource usage at a specific time. Enabling the sleeping Tabs option in your browser will improve the system’s overall performance. Inactivated sleeping tabs mean they will be put to sleep when not in use.
With this feature, you can experience a performance difference when your device’s battery is low. Sleeping tabs allow background tabs to be in a sleep state, which releases system resources like memory and CPU. So, it is very important to enable this option.
You know the Microsoft 365 admin centre can control the Edge feature and allow the administrator to manage the settings. So, in this post, we are here to help you learn how to enable and disable the Sleeping Tabs Timeout in Edge using the Microsoft 365 Admin Center.
Table of Contents
What is the Importance of Sleeping Tabs Timeout in Edge?
Sleeping Tabs Timeout is an essential setting feature in Edge. Managing the timeout of the sleeping tabs in Microsoft Edge through the Microsoft 365 Admin Center is a powerful way for organizations to optimize browser performance and enhance productivity.
Enable Disable Sleeping Tabs Timeout in Edge Browser using the Microsoft 365 Admin Center Policy
Above, we discussed an overall view of Sleeping Tabs Timeout, a valuable feature in an Edge. You can enable or disable this feature at an Administrator level in the Microsoft 365 Admin Center. So, let’s look at how to Enable Disable Sleeping Tabs Timeout in Edge using the Microsoft 365 Admin Center. You can do this with administrator-level access to Microsoft 365 Admin Center.
- Sign in to the Microsoft 365 Admin Center
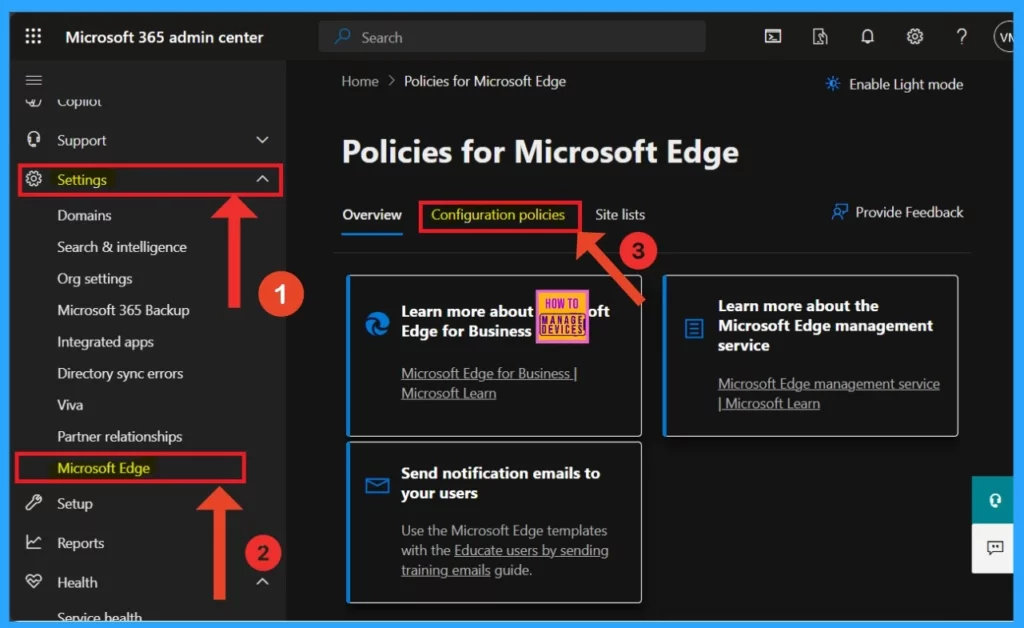
- Navigate through the settings>Microsoft Edge
- Click on the configuration profile
- Enable Address Bar Editing in the Edge Browser using the Microsoft 365 Admin Center Policy
- Configuration Profile For Edge Browser Extensions And Sidebar Management Using Microsoft 365 Admin Center HTMD Blog
- Enable Optimized Performance of Edge Browser | Windows 11 | Intune | Group Policy
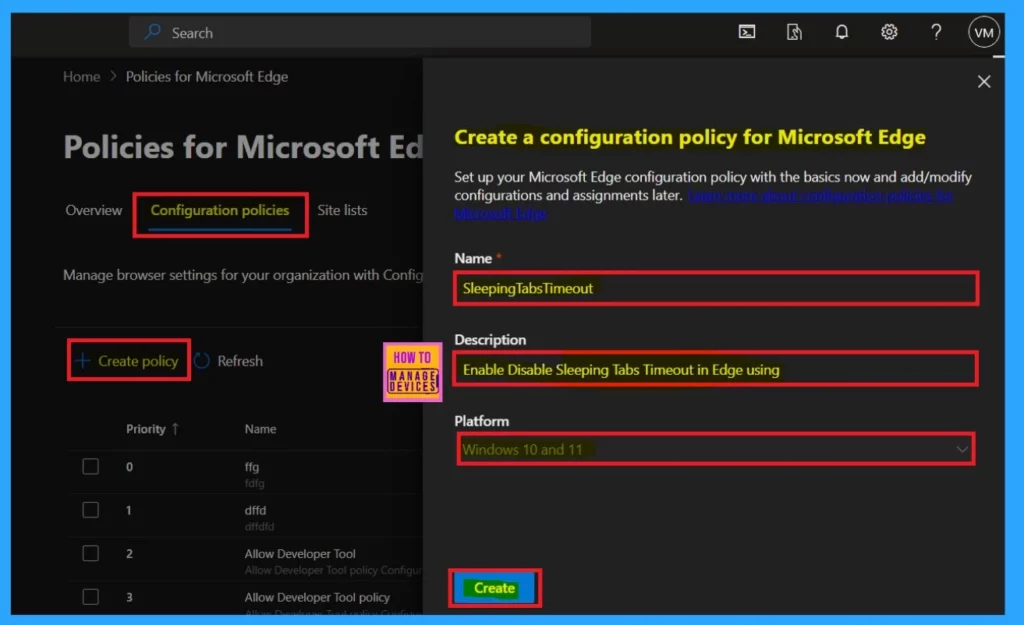
You will see the Create policy option when you click on the configuration profile. The configuration profile manages browser settings for organizations with configuration policies. You will see a basic setup window when you click on the Create policy. There, you have three options: name, description, and platform.
- Name– SleepingTabsTimeout
- Description – Enable Disable Sleeping Tabs Timeout in Edge using
- Platform–Windows 10 and 11
- Click on Create
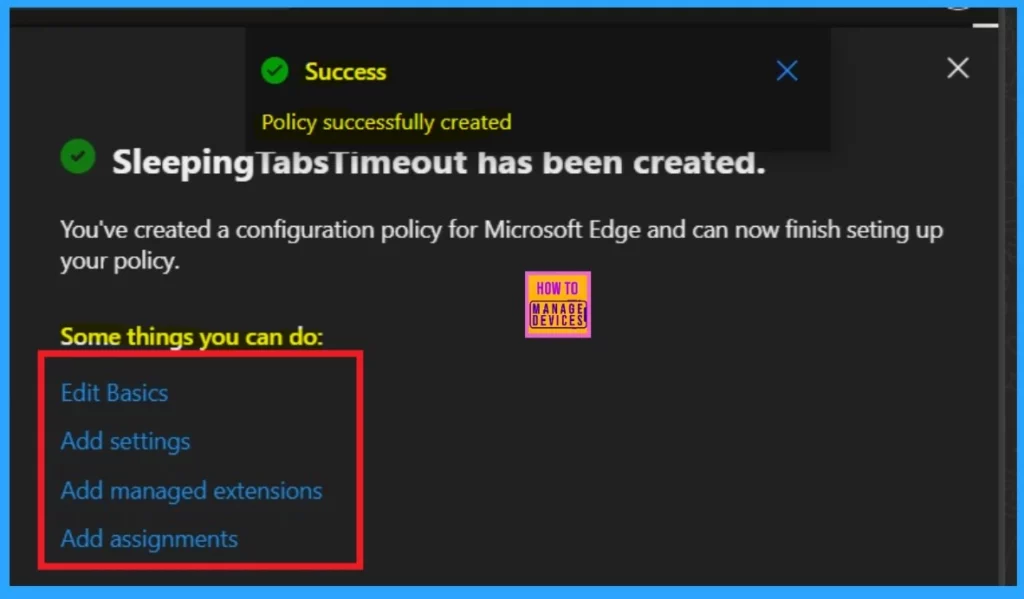
When you click Create, you will receive a success notification, meaning the policy you created was successfully created. It will be displayed on the Configuration policy list. You can quickly add policy management through Edit Basics, Add Settings, etc.
- Now you can close this window.
| Policy Options | Info |
|---|---|
| Edit Basics | Add basic details like Name and description, platform. |
| Add Settings | Allows settings for the policy. |
| Add managed Extesions | With this, administrators add the extension, MS Edge. |
| Add assignments | You can add a group to which you want to assign the policy. |
Configuration Policies
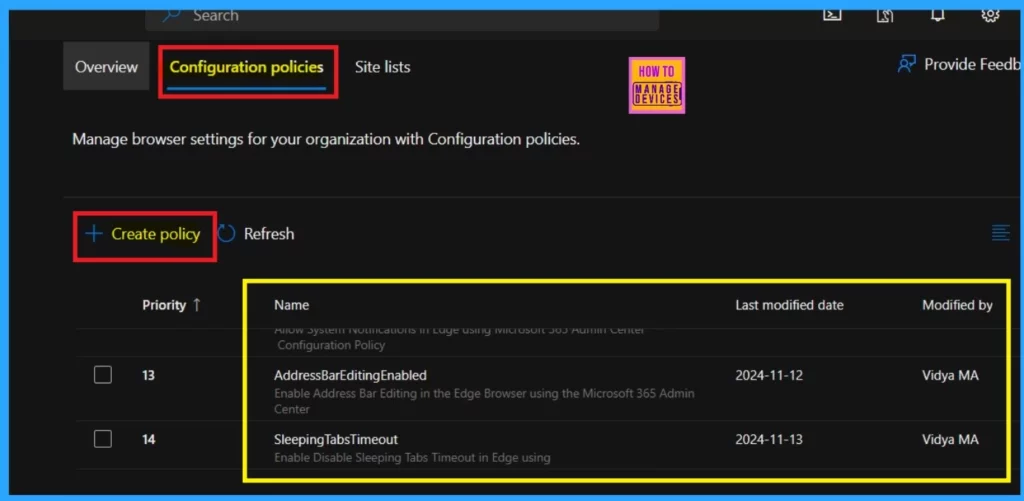
After closing the configuration basic setting, you will be in the Configuration policy window. You can see a list of policies you created early in that window. Our new policy for sleeping tab timeout is on that list.
- Click on the +Create Policy.
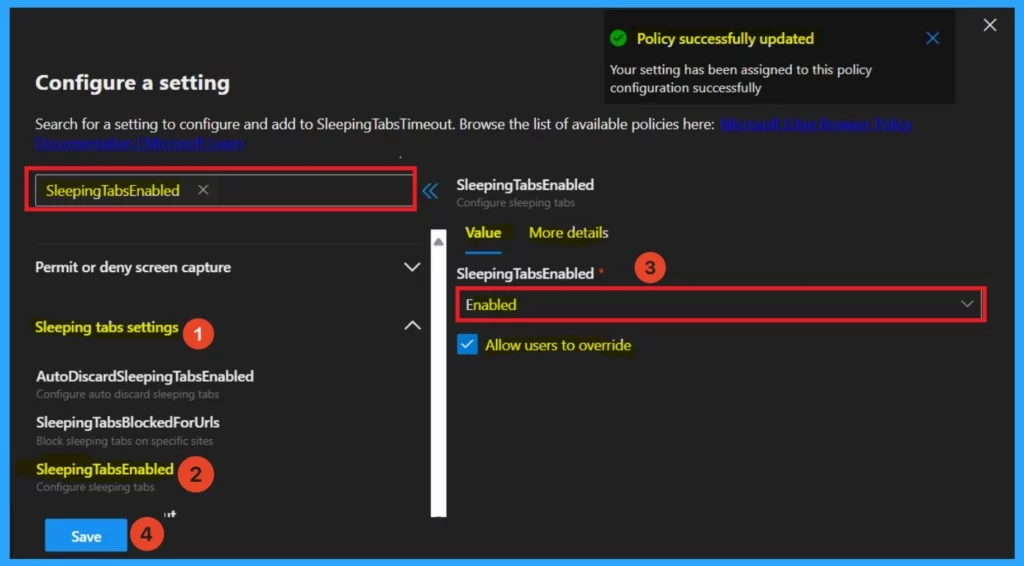
After clicking Create policy, you can select the policy name from the Sleeping tab settings. When you get that, click the Sleeping tab, which is the Enabled option. Now, you can see the value tab on the right side of the window. This is the most essential section.
- Here, you can set the value as Enabled or Disabled( you can get those options by clicking on the drop-down arrow.)
- Select the option to allow users to override
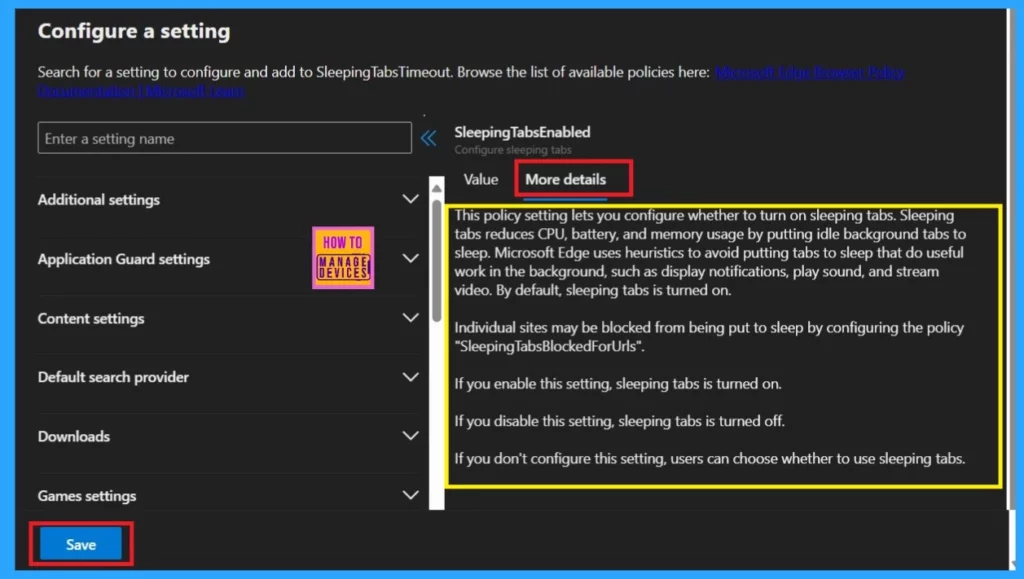
Near the value tab, you will get the More Details option. With this option, you will get more details about the policy for sleeping tabs. This setting lets you decide how long inactive background tabs stay open before they go to sleep. By default, tabs sleep after 2 hours (7,200 seconds) if the sleeping tabs feature is turned on.
- Tabs will only go to sleep automatically if the “SleepingTabsEnabled” policy is turned on or not set and the user has enabled the sleeping tabs feature.
- Users can choose the timeout value if you don’t configure this policy.
- Now you can click on the Save.
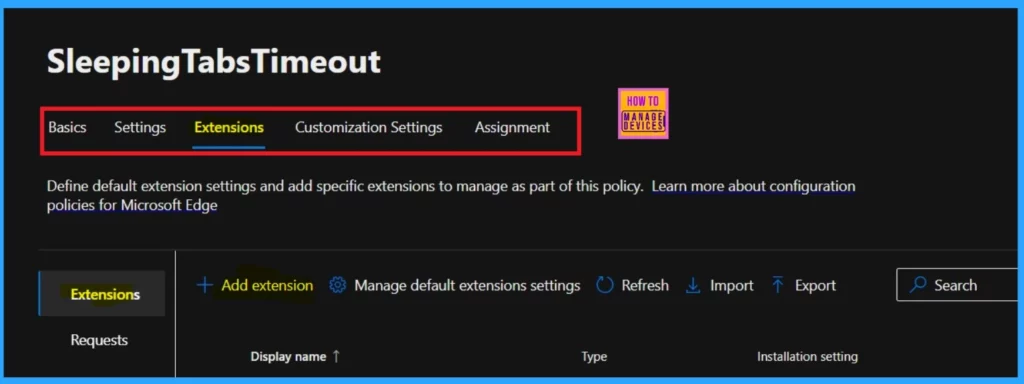
Extensions
The extension settings are mandatory in this section, allowing default extension settings and specific extensions to manage the policy. In this extension tab, you have added an extension option for adding extensions to the edge policy.
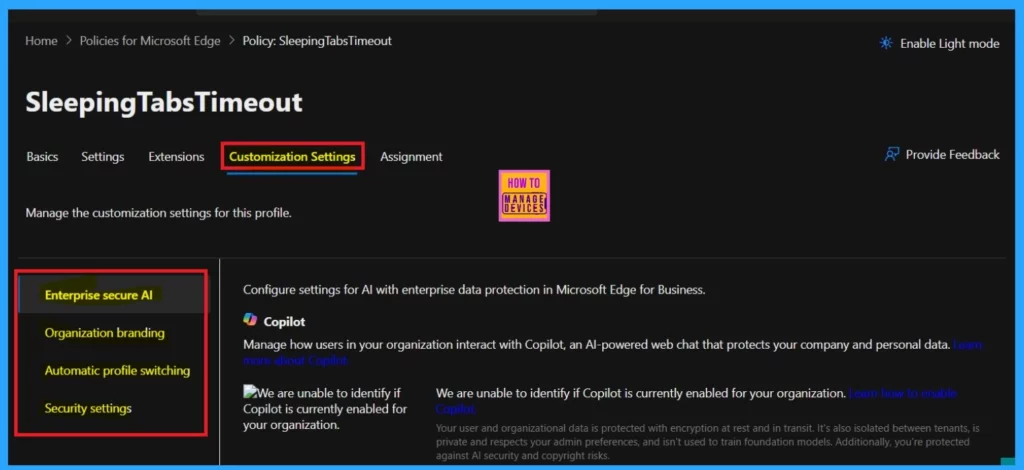
Customization Settings
The next tab is Customization Settings. Here, you can manage the profile’s customization settings. There are 4 options available: Enterprise secure AI, Organization Branding, Automatic profile switching, and Security Settings.
Assignment
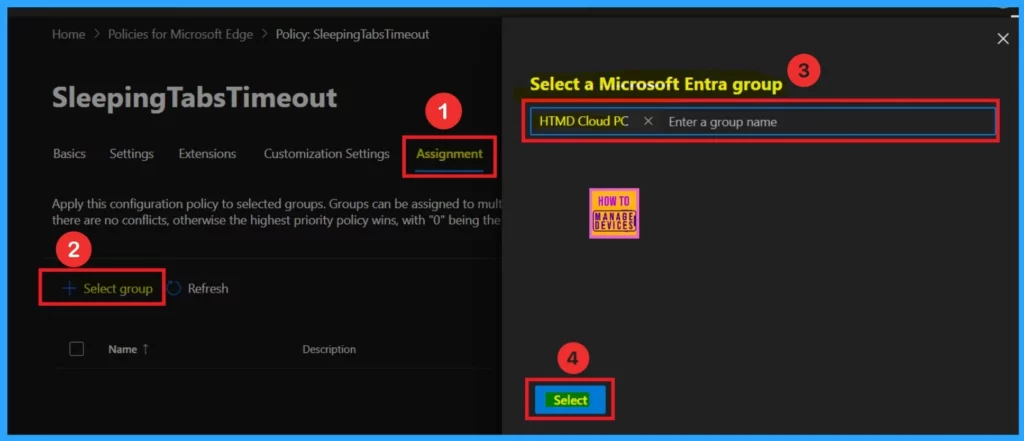
The assignment section is one of the most important sections because we assign the policy to a specific group of Microsoft executives. To do that, click on the assignment and then click on the select group. Here, I selected it for the HTMD cloud PC.
- This policy only affects the selected groups.
- Now Click on the Select.
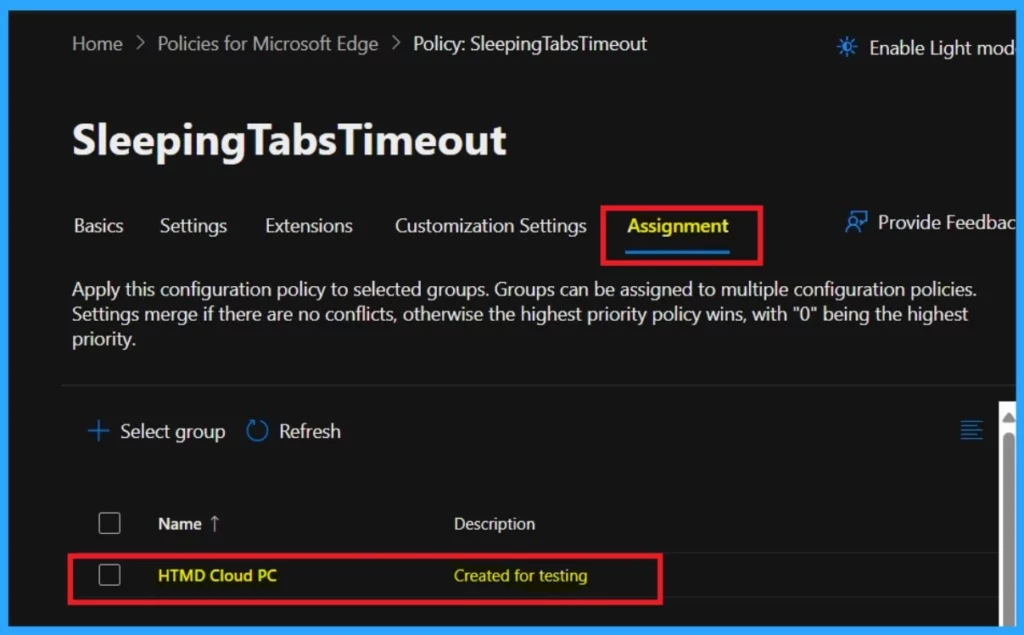
Now, you can close the select group window and see that the policy’s selected group has been created for testing. The screenshot below shows this. This configuration policy can be assigned to multiple configuration policies when applied to selected groups.
- The settings will merge if there are no conflicts.
- The policy with the highest priority (0 being the highest) will apply.
End Result
When you complete the policy creation, and everything is going fine (the policy has been successfully updated), you can check into the Cloud PC( Because I assigned the policy to the Cloud groups). First, log in to the Cloud PC, open the Edge browser, and Click on the three-dot menu(See more).
- To see more, select the Setting option.
- Go to the system and Performance option.
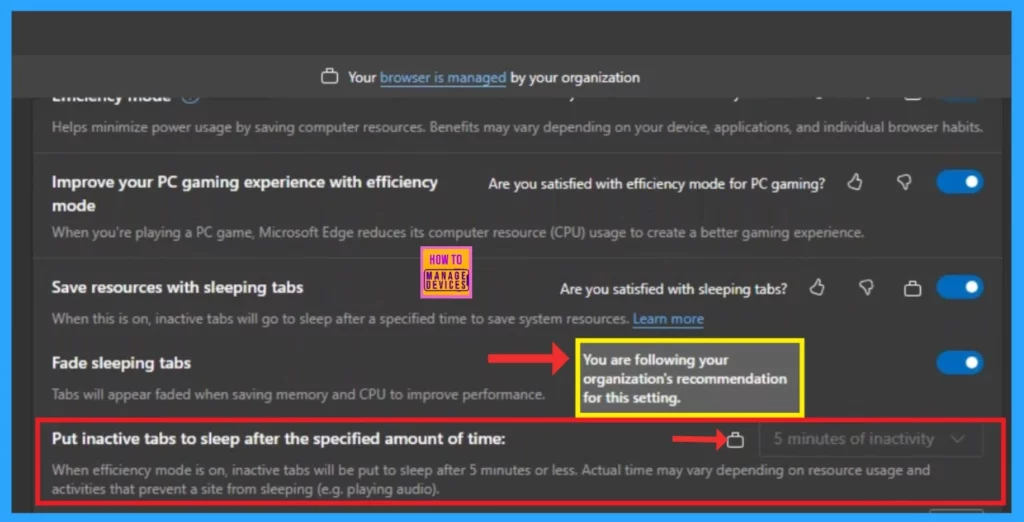
- You can see the sleeping tabs option under Optimize Performance in the system and the Performance option.
- There, you can see that the Sleeping tab options are enabled, and ‘‘Put inactive tabs to sleep after the specified amount of time” is set to 5 Minutes of inactivity.
- You can’t change this option in the Edge settings because the settings are greyed out(Locked).
- You can see a lock option in the ‘Put inactive tabs to sleep after the specified amount of time” option. When you click on it, it shows,” You are following your organization’s recommendation for the settings.”
Enable Sleep tabs in Edge through Intune
We have written a post on enabling Microsoft Edge Sleeping Tabs using Intune. With this post, you can allow Sleep tabs in Edge through Intune. Those simple steps will guide you to help with policy creation.
See More: Learn How to Enable Microsoft Edge Sleeping Tabs using Intune

Need Further Assistance or Have Technical Questions?
Join the LinkedIn Page and Telegram group to get the latest step-by-step guides and news updates. Join our Meetup Page to participate in User group meetings. Also, Join the WhatsApp Community to get the latest news on Microsoft Technologies. We are there on Reddit as well.
Author
Anoop C Nair has been Microsoft MVP from 2015 onwards for 10 consecutive years! He is a Workplace Solution Architect with more than 22+ years of experience in Workplace technologies. He is also a Blogger, Speaker, and Local User Group Community leader. His primary focus is on Device Management technologies like SCCM and Intune. He writes about technologies like Intune, SCCM, Windows, Cloud PC, Windows, Entra, Microsoft Security, Career, etc.
