Let’s discuss how to enable or disable No Pinning to Taskbar Policy using Intune Setting Catalog. The Microsoft Intune Settings Catalog is a central feature offering a complete view of all configurable device settings in Intune.
The Intune policy No pinning to taskbar stops users from attaching apps to their Windows taskbar. Limiting taskbar customization also improves security by making it less users will accidentally install or change apps that could harm the system.
This setting lets you decide if users are allowed to pin apps to their Taskbar. With this policy enabled, users lose the ability to modify their Taskbar. Users can still see what’s pinned, but they can not unpin it or add new ones.
With this setting disabled or not configured, people can freely change which programs are currently pinned to their Taskbar. They will have the ability to add, remove, and rearrange the applications displayed there. This blog post will provide a step-by-step guide on how to enable or disable the No Pinning to Taskbar policy using the Intune Settings Catalog.
Table of Contents
In What Types of Environments is use No Pinning to Taskbar Policy and Why?
It’s particularly useful in enterprise environments where a standardized desktop layout is desired to ensure consistency, simplify management, enhance security, and potentially improve productivity.
Windows CSP Details – Start
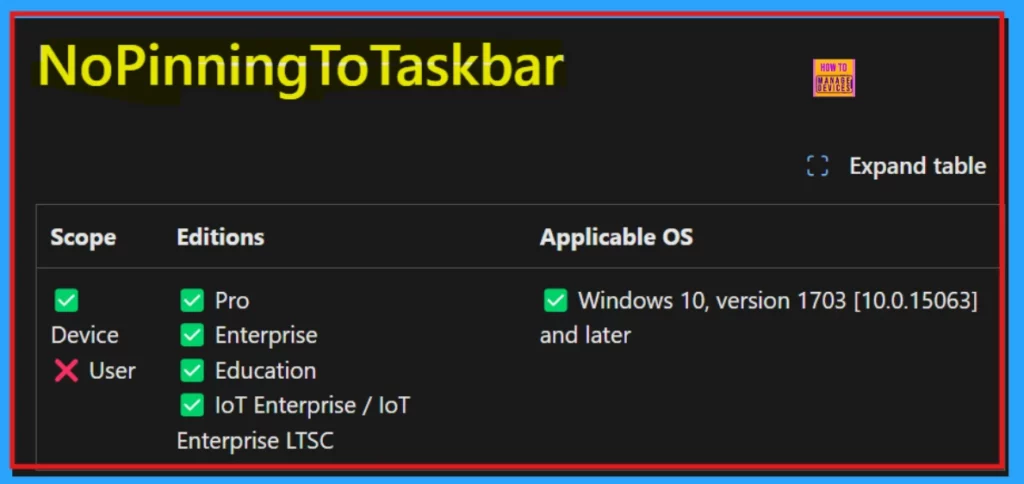
This configuration setting applies specifically to devices running certain editions of Windows 10 and later. It is compatible with Pro, Enterprise, Education, and IoT Enterprise (including LTSC) editions, but does not apply to user-level settings. The setting is supported on devices running Windows 10 version 1703 [10.0.15063] and later.
Description framework properties: Through the Description framework properties, we can understand the features and functionalities of these specific policies.
| Property Name | Property Value |
|---|---|
| Format | int |
| Access Type | Add, Delete, Get, Replace |
| Default Value | 0 |
Allowed Values: Within CSP, the Allowed Values dictate the specific inputs that are permitted for a given policy or setting.
| Value | Description |
|---|---|
| 0 (Default) | Pinning enabled |
| 1 | Pinning disabled |
./Device/Vendor/MSFT/Policy/Config/Start/NoPinningToTaskbar
- Configure Taskbar Calendar Deployment via Setting Catalog in Intune
- New Microsoft 365 Taskbar Experiences People Files and Calendar at Your Fingertips
- Unpin Microsoft Store Apps from Taskbar with Intune | Do Not Allow Pinning Store App to the Taskbar
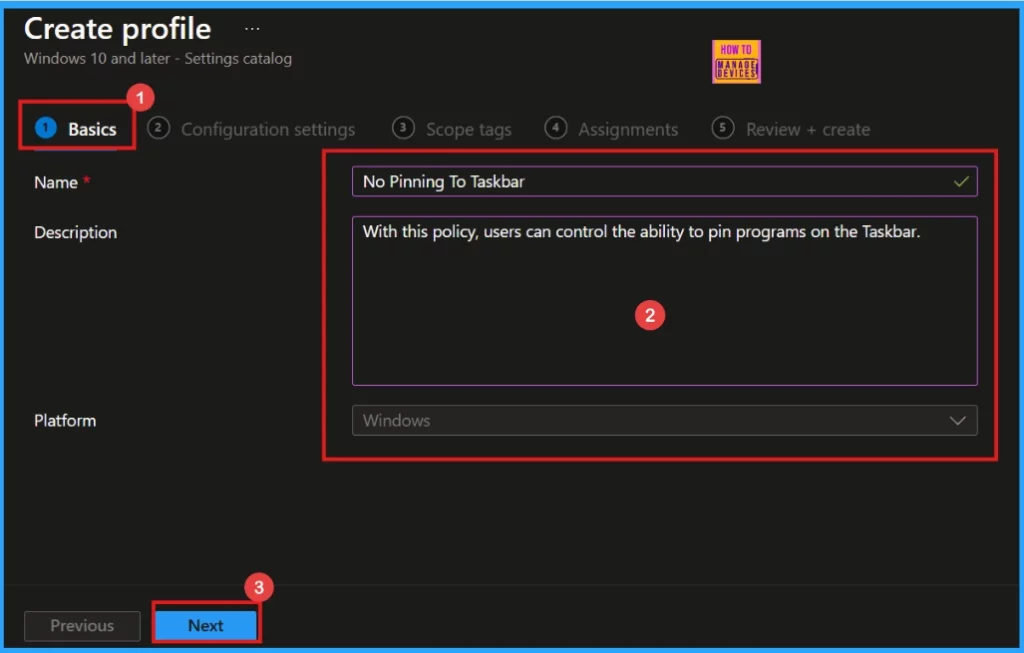
Steps to Enable or Disable No Pinning To Taskbar Policy using Intune
To configure the No Pinning To Taskbar policy in Intune, first sign in to the Microsoft Intune admin center. Next, navigate to Devices and then Configuration. On the left-hand side, you’ll see the Policies tab. Click on the dropdown arrow next to Policies and choose New Policy.
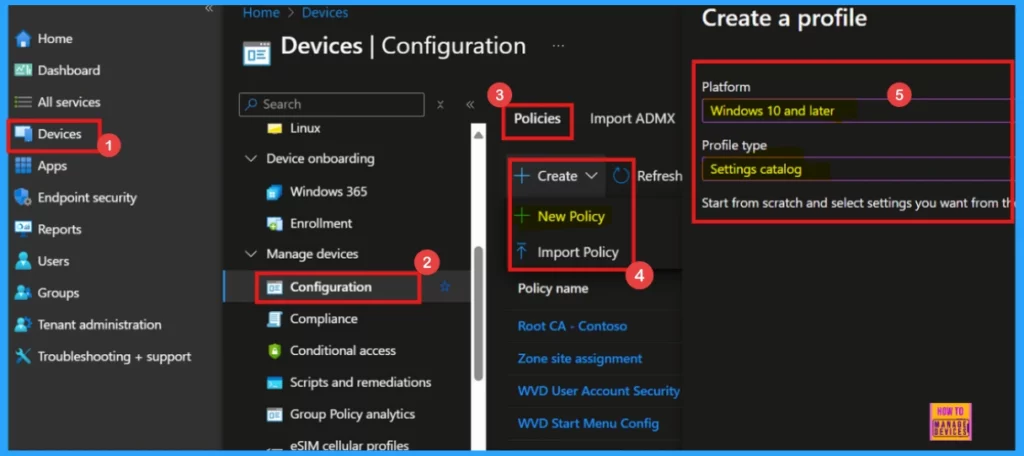
After clicking New Policy, you will need to specify the platform and profile type. This step is essential because it dictates which devices the policy will affect and which settings you can configure. For the No Pinning To Taskbar policy, usually pick Windows 10 and later as the platform, and then select Settings catalog as the profile type.
- To continue, click Create.
Configuration Setting
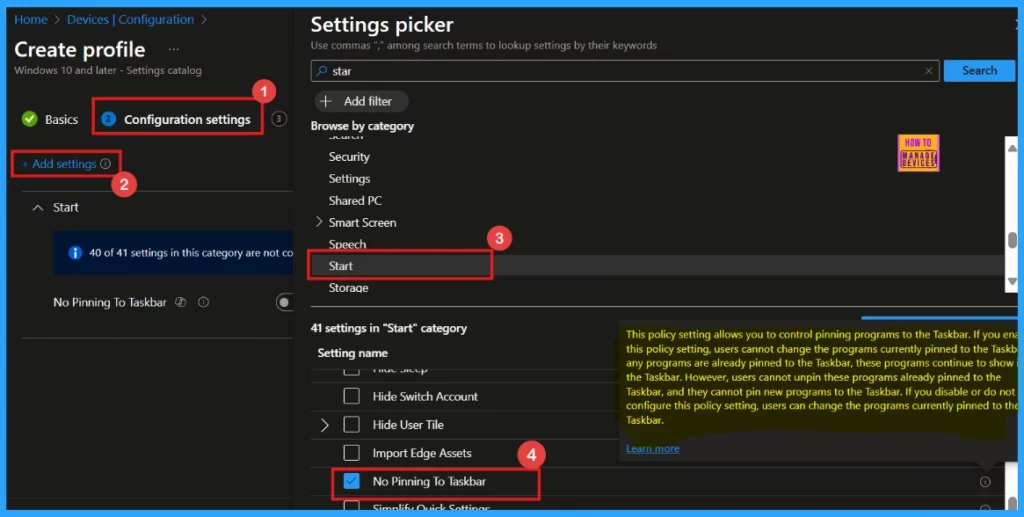
An important part of policy creation is the configuration settings. After the initial steps, the configuration settings page is next. On this page, we will see the +Add Settings option. Clicking it will bring up the Settings Picker window.
In the Settings Picker, search for “Start“, then expand the Start category to reveal its 41 sub-settings. Select “No pinning to Taskbar”, and close the Settings Picker.
Enable or Disable No Pinning to Taskbar
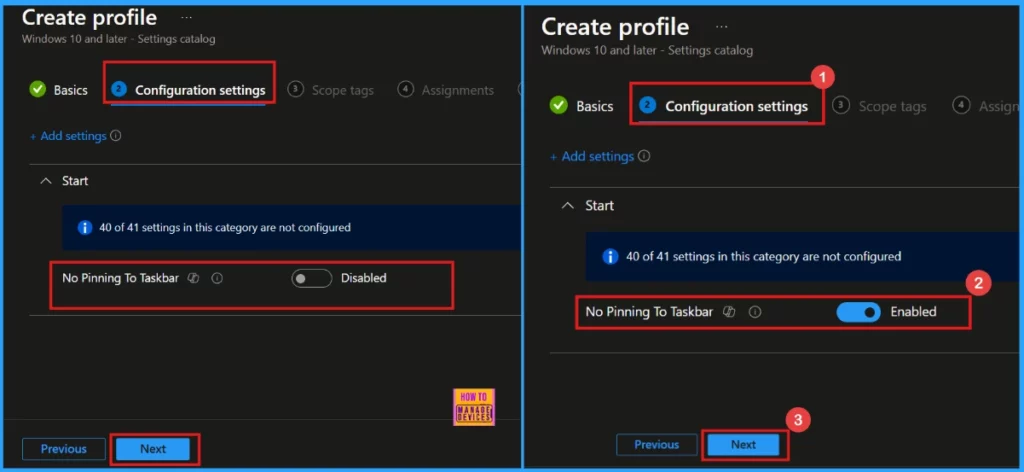
Returning to the configuration settings page after closing the Settings Picker, we can see that the No Pinning to Taskbar option is initially disabled. You can leave this setting as it is and click Next to proceed.
If you wish to enable the policy, toggle the switch to the right. The display will change to blue, confirming that it’s enabled. Continue by clicking Next. In this scenario, I will need to enable the “No Pinning to Taskbar” option.
Scope Tags
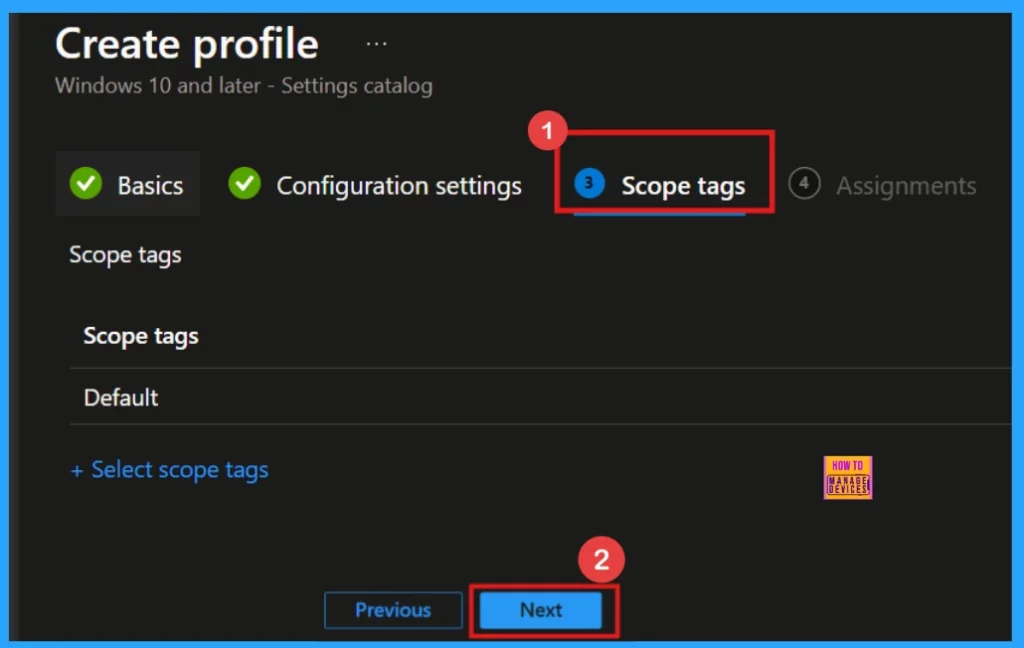
The next step after Configuration is Scope tags. Here we have the choice to add scope tags to this policy for organizational purposes and easier filtering. However, this is not mandatory, and we can proceed by clicking Next if we don’t need them.
Assignment
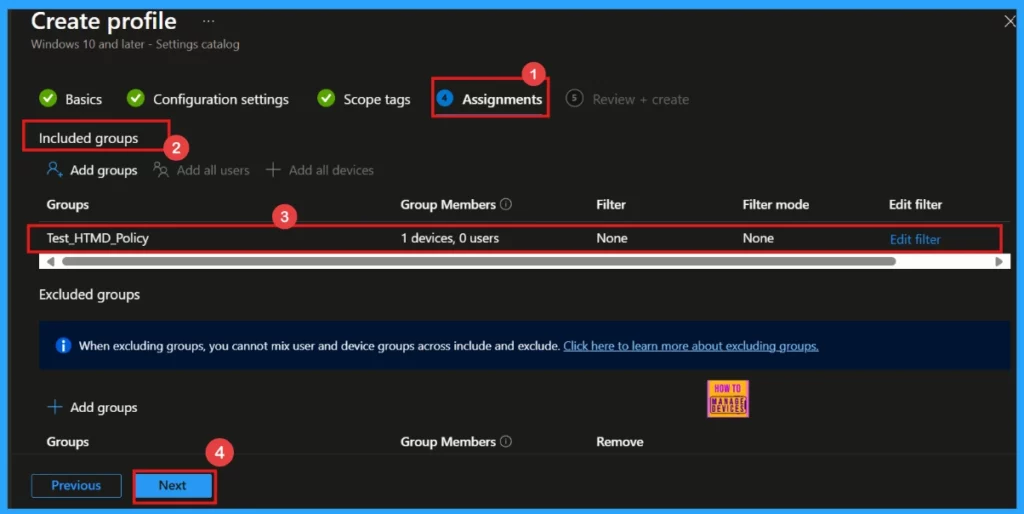
The Assignment tab is the next important step, as it’s where we apply the policy to specific groups. Click Add Groups under Include Group to see the available groups, and then select the one we want to target. The selected group will be added to the assignment list. After confirming, click Next to continue.
Review + Create
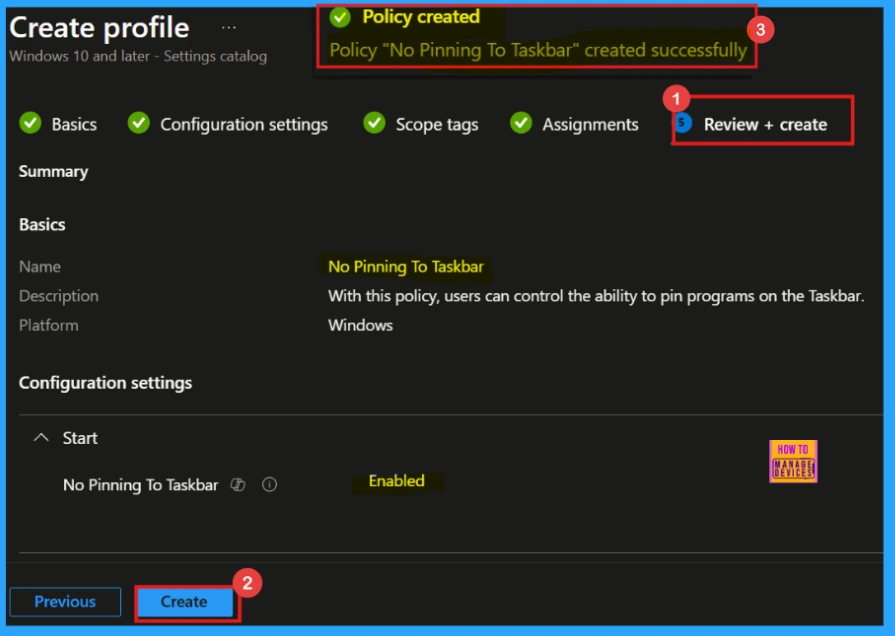
The final step in setting up the policy is the Review + Create stage, which we will reach after completing the assignments. Here, take a moment to review all the details, including the basic information and configuration settings. If satisfied, click Create to finalize and apply the policy.
Monitoring Status
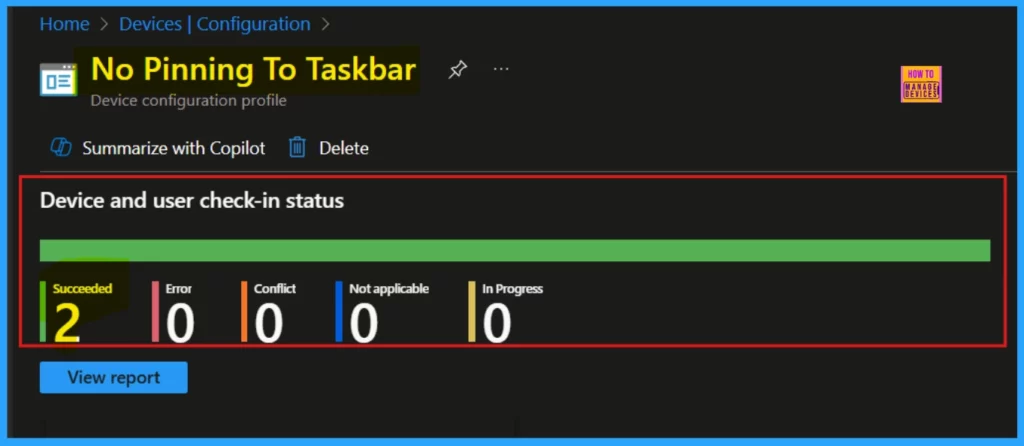
Once the policy is created, we can initiate a device sync on the Company Portal for quicker deployment. Afterwards, we can track the deployment status within the Intune Portal, where a successful deployment will be indicated by a status of succeeded.
- Go to Devices > Configuration profiles, then select the policy to view its status.
Client-Side Verification
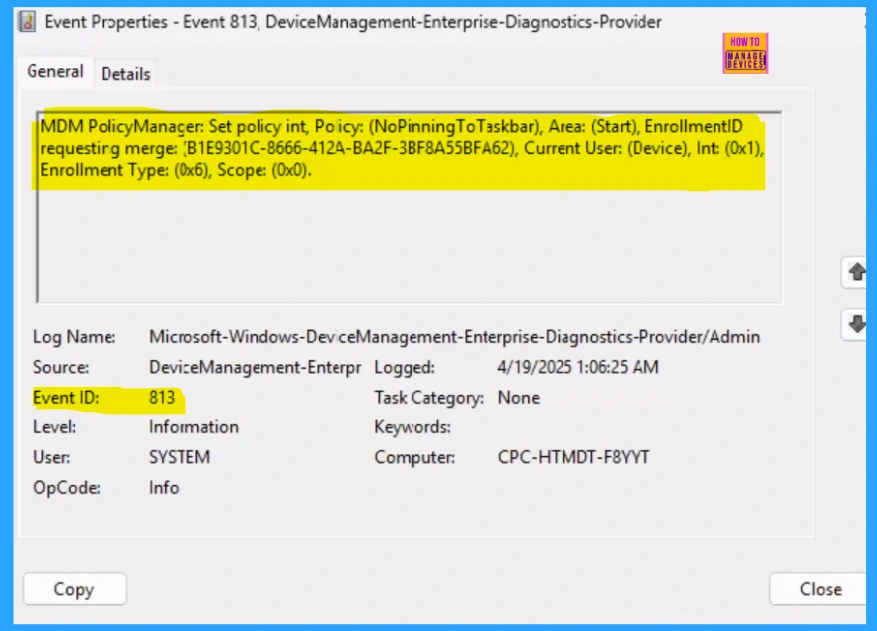
For monitoring Intune status, the Event Viewer application can be used. Open it by searching for Event Viewer in the Start menu. Once launched, navigate through the following log path: Services Logs > Microsoft > Windows > DeviceManagement-Enterprise-Diagnostics-Provider > Admin.
MDM PolicyManager: Set policy int, Policy: (NoPinningToTaskbar), Area: (Start), EnrollmentID
requesting merge: (B1E9301C-8666-412A-BA2F-3BF8A55BFA62), Current User: (Device), Int: (0x1),
Enrollment Type: (0x6), Scope: (0x0).
How to Remove Assigned Group from NoPinningToTaskbar Policy
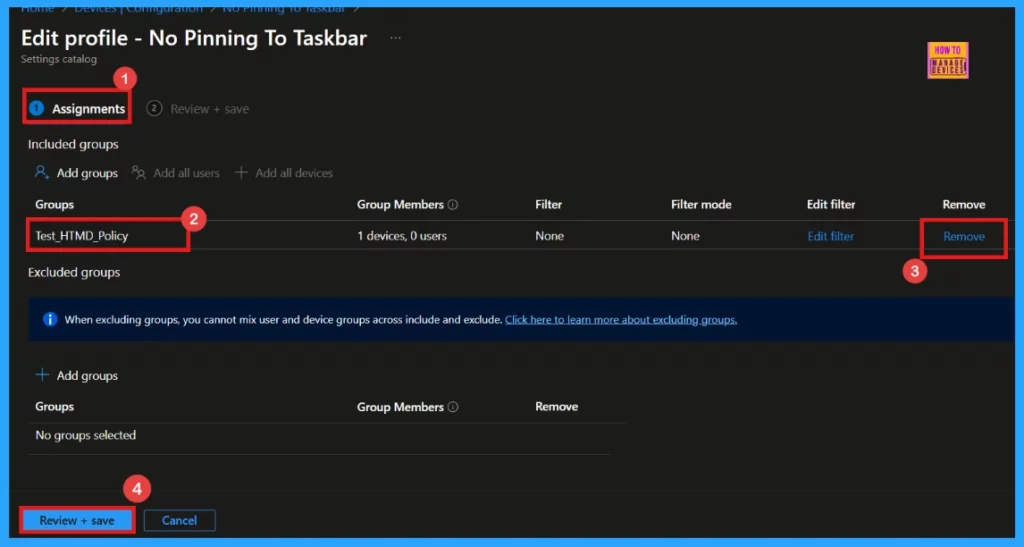
Removing an assigned group from the NoPinningToTaskbar Policy is straightforward. Simply open the policy, navigate to the Assignment tab, and then select the Edit option. Further details on this process can be found in the post below.
For detailed information, you can refer to our previous post – Learn How to Delete or Remove App Assignment from Intune using Step by Step-by-Step Guide
Delete NoPinningToTaskbar Policy
If you need to remove the NoPinningToTaskbar policy, the Intune Portal makes it easy. You can find the policy deletion steps in the following post.
How to Delete Allow Clipboard History Policy in Intune Step by Step Guide

Need Further Assistance or Have Technical Questions?
Join the LinkedIn Page and Telegram group to get the latest step-by-step guides and news updates. Join our Meetup Page to participate in User group meetings. Also, Join the WhatsApp Community to get the latest news on Microsoft Technologies. We are there on Reddit as well.
Author
Anoop C Nair has been a Microsoft MVP for 10 consecutive years from 2015 onwards. He is a Workplace Solution Architect with more than 22+ years of experience in Workplace technologies. He is a Blogger, Speaker, and Local User Group Community leader. His primary focus is on Device Management technologies like SCCM and Intune. He writes about technologies like Intune, SCCM, Windows, Cloud PC, Windows, Entra, Microsoft Security, Career, etc.
