Hi, today we are discussing how to Enable Offline Maps Auto Update through Setting Catalog via Intune As you all know, maps are essential for those who travel frequently. Offline maps allow users to download maps to their devices, enabling access to navigation and location information without needing an internet connection.
Intune’s settings catalog is an important feature for deploying policies within an organization. Disabling or Enabling Offline Maps Auto Update has a significant impact because it ensures users can access the most up-to-date information about routes and road conditions.
The Auto-update feature keeps maps current, ensuring users can access the latest data and avoid navigation errors. This policy can be turned on or off in Microsoft Intune using the settings catalog. However, some users may not require the Offline Maps Auto-Update updates.
Some users may concerned that it affects internet data, so it’s preferable to enable or disable the policy. So in this tutorial I will here to help you to Disable or Enable the policy of Offline Maps Auto Update.
Table of Contents
What are the Benefits of Disabling Offline Maps Auto Update?

Turning off offline maps auto-update is useful for many reasons. It helps control data usage by preventing automatic updates, which is very useful when your Internet data is limited. Additionally, it helps with storage management by preventing unwanted updates from using up storage space.
Enable Offline Maps Auto Update – CSP Details
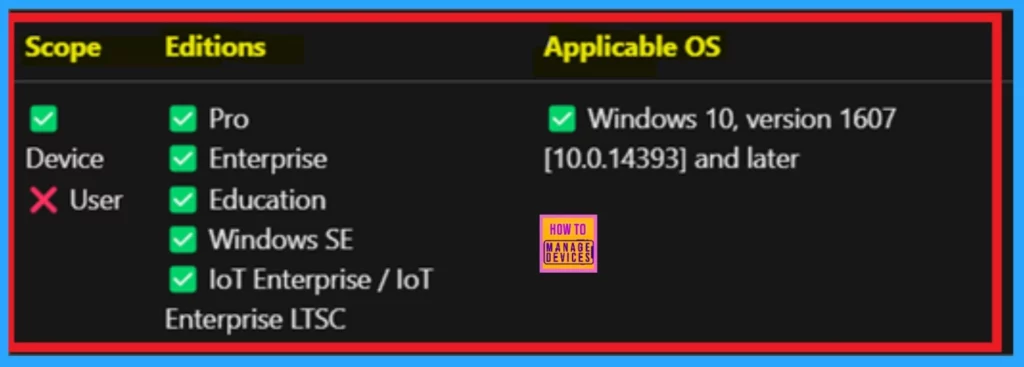
To get started with Microsoft, you’ll need to understand the CSP (Configuration Service Provider) details related to this policy. This policy will provide you with detailed information, including applicable editions, operating systems, and more. It’s important to note that this feature is only applicable to specific devices.
| Scope | Editions | Applicable OS |
|---|---|---|
| Applicable for Devices | Pro | Windows 10, version 1607 [10.0.14393] and later |
| Not Applicable for user | Enterprises | |
| Education | ||
| Windows SE | ||
| loT Enterprise / loT Enterprise LTSC |
- Check for Offline Maps Updates in Windows
- Download and Use Offline Maps in Windows
- Managing Network Drive Mappings with Intune
Create Profile
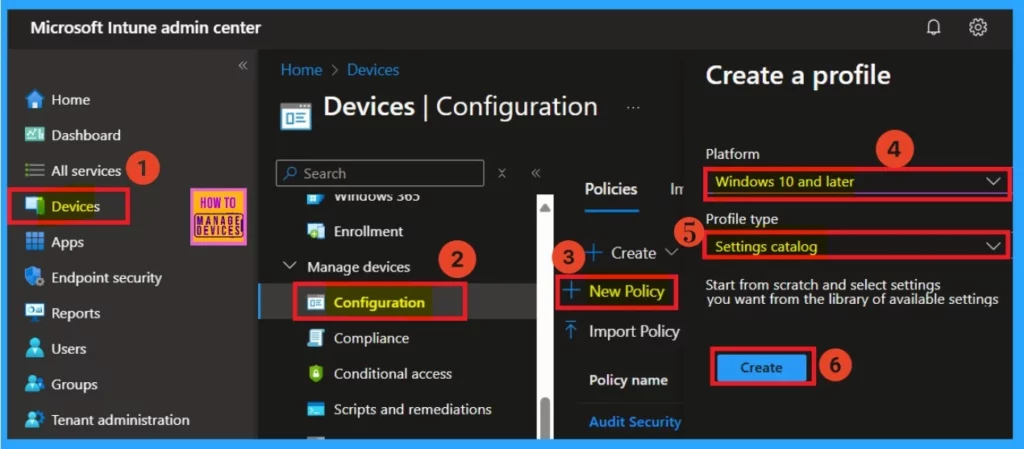
Creating a profile is the first step in deploying a policy. First, sign into the Microsoft Intune admin center. Then, click on the “Devices>Configurations” Then click on the “Create New Policy.” When you click New Policy, a window will open where you can select the platform and profile type.
- I selected “Windows 10 and later” for the platform and “Device Configuration” for the profile type.
- Finally, click on “Create.”
Basics
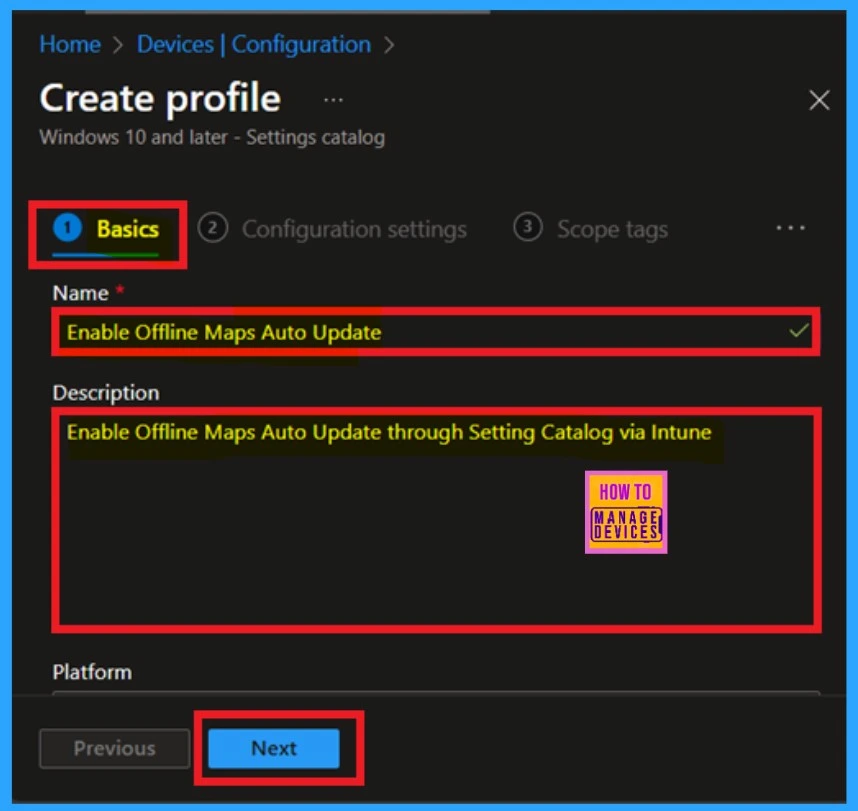
When creating a profile, the next step is to fill out the basics in the Basics section. You must give a name for the policy and a description, which is mandatory. I recommend entering a detailed description to help you better understand the policy later. Select the platform; Windows should already be selected by default.
- Click “Next” to continue.
Configuration Settings
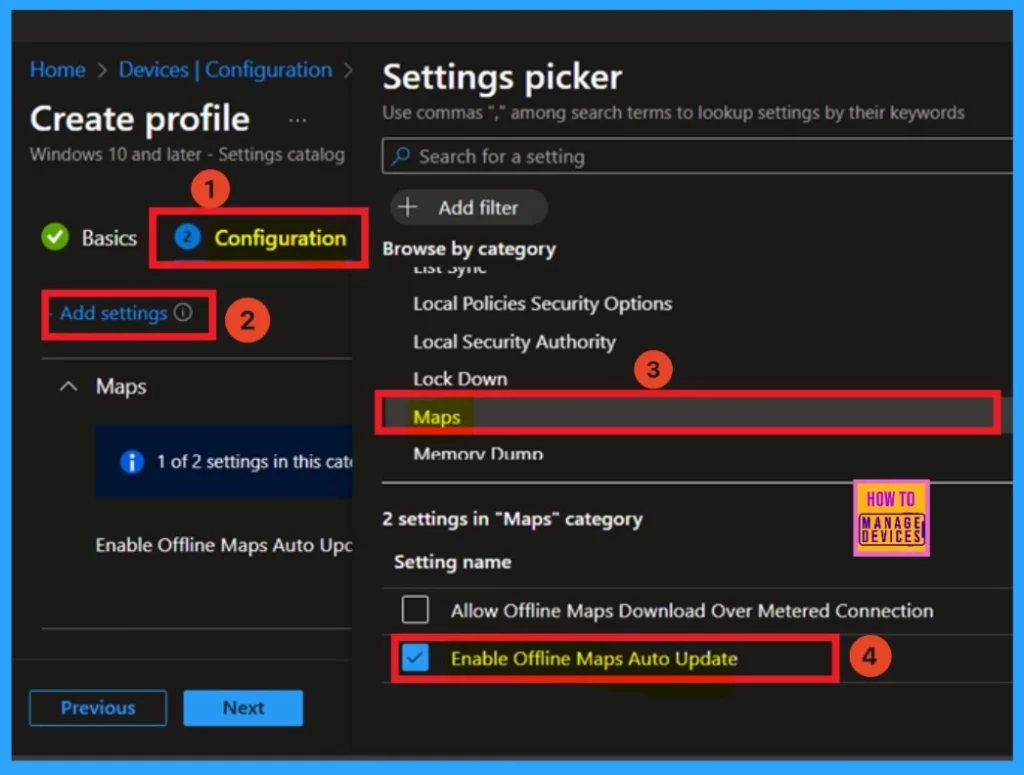
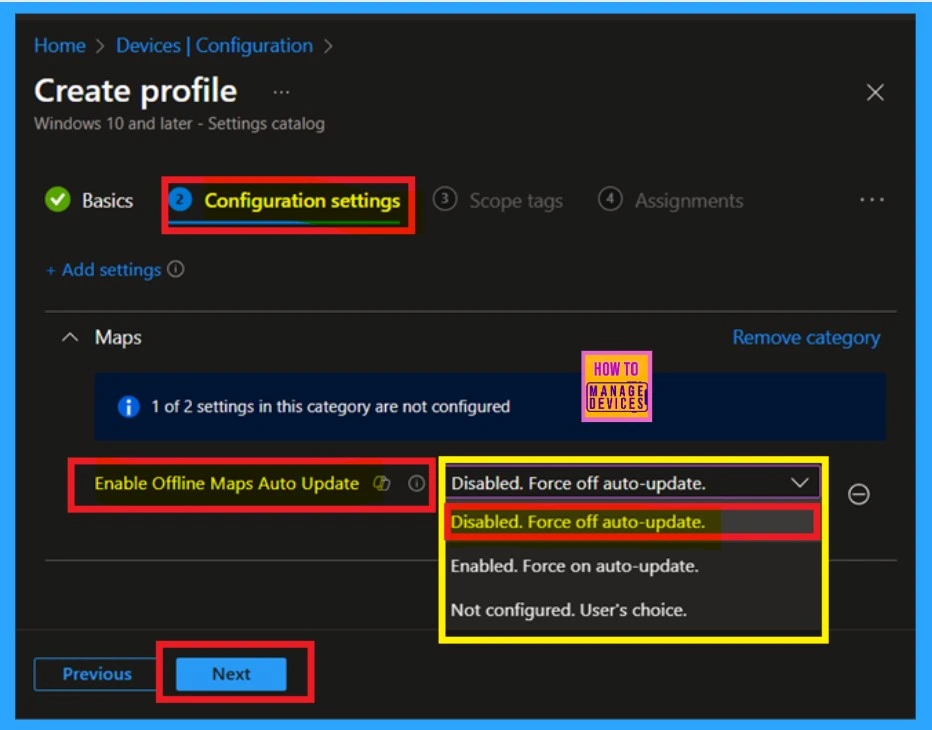
The configuration setting is another step you have to deal with that. One of the important sections in the configuration tab is the settings option. To access it, click on the hyperlink labelled “Add Settings.” This will open the settings picker window. You can search for the Map option in the settings picker window.
Under the map options, you will see 2 settings listed. Select the option “Enable Offline Maps Auto Update.” Once you select this option, a blue tick will appear next to its name. You can then easily close the settings picker.
When you close the settings picker window, you’ll be back to the configuration settings tab. Here, you can see the option to enable offline map auto-update is now visible. You have the ability to either enable or disable this auto-update. There are 3 suggestions available:
| Offline Map Auto-Update | Info |
|---|---|
| Disabled – Force off auto-update | This setting ensures that auto-updates are completely turned off. |
| Enabled – Force on auto-update | This setting forces auto-updates to be always on. |
| Not configured – User’s choice. | This setting allows users to choose whether they want to enable or disable auto-updates |
- Here I selected the option ”Disabled Force off auto-update”.
- If you need to Enable Auto update for Offline Map select Enabled Force on auto-update
- Then Click on the Next.
Scope Tags
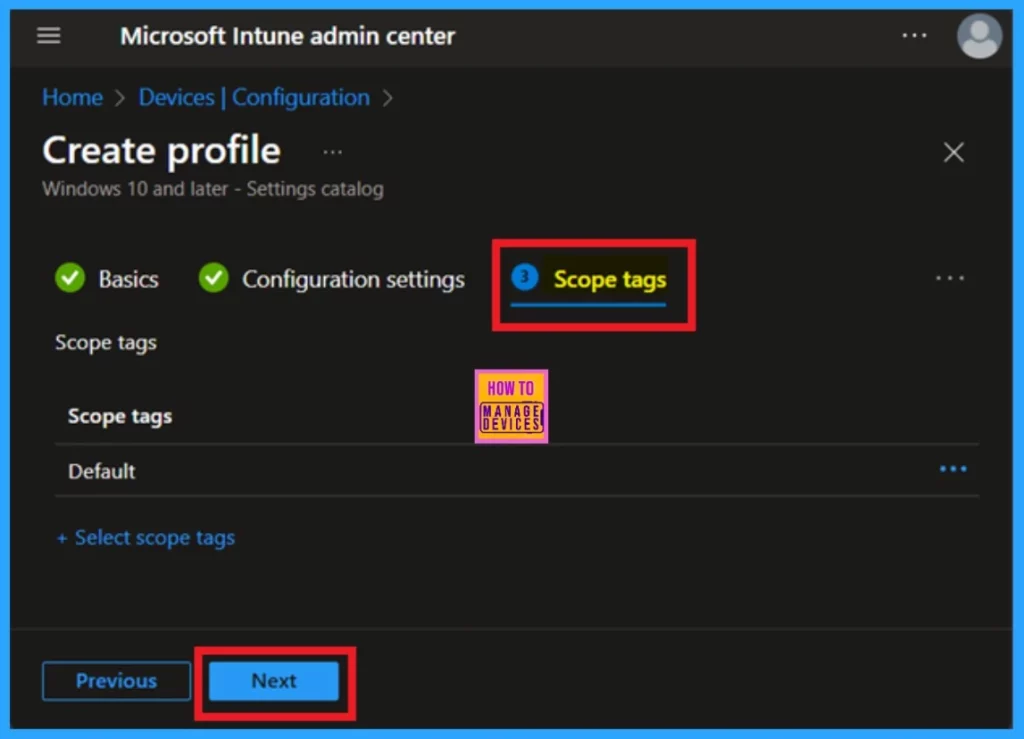
The next section is the Scope Tag. The Scope Tag is part of the policy Deployment. Scope tags are a mandatory step to add a scope tag to the policy. You can easily do this. I skipped this section and clicked on the next.
Assignments
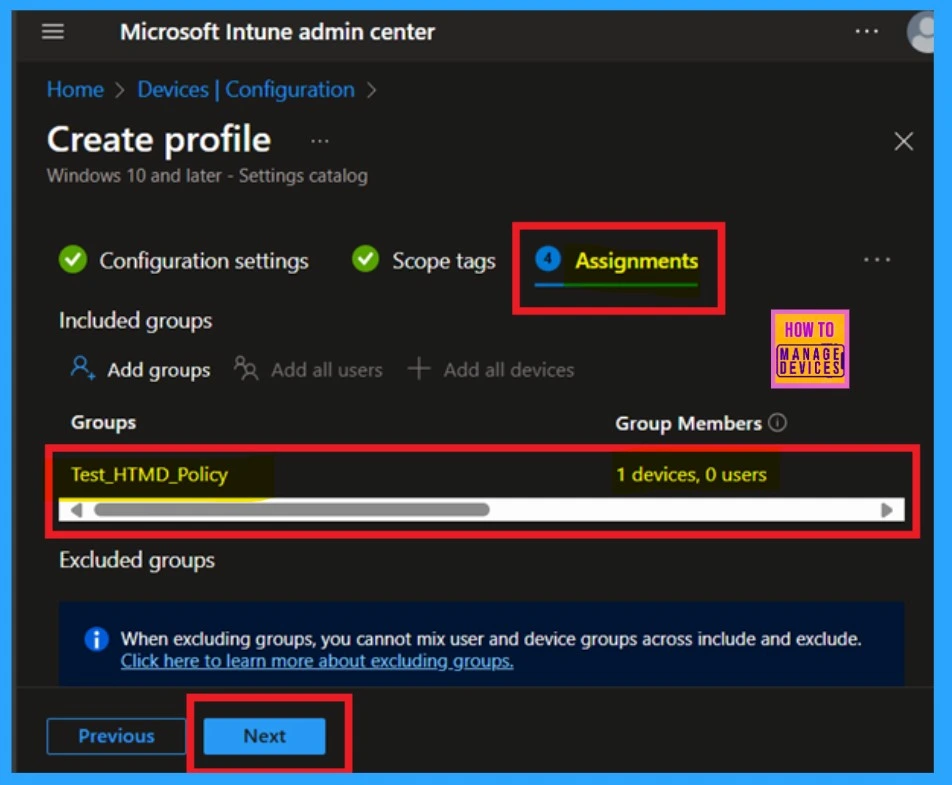
In the assignment section, you can specify the important groups you want to apply this policy to. This step is crucial. Similar to configuration settings, we are deploying policies for specific groups in this section. You will have the option to add groups.
You can see that the add group option is under the Include. Click on the Add group option. After clicking “Add Groups,” you can select the specific group to which you want to deploy the policy. Choose the desired group and click “Next.”
Review + Create
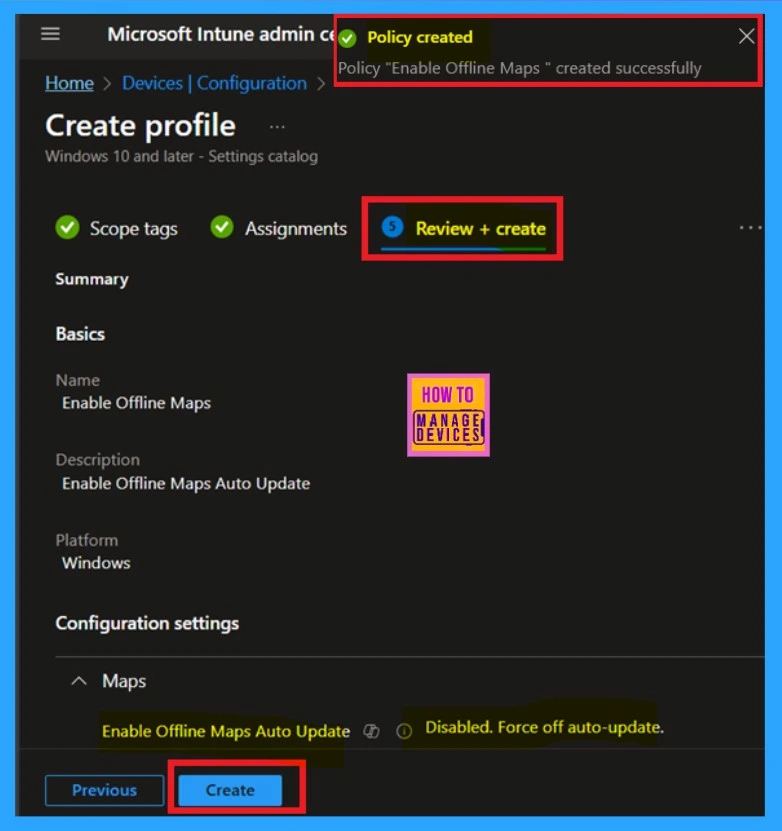
The Review+ Create option serves as a summary page. Here, you can view all the details you have added during the policy creation process. If you wish to make any changes, you can do so before clicking on the “Create” button. After reviewing all the details, click the “Create” option then you will notified that to successfully created your policy.
Monitor Status
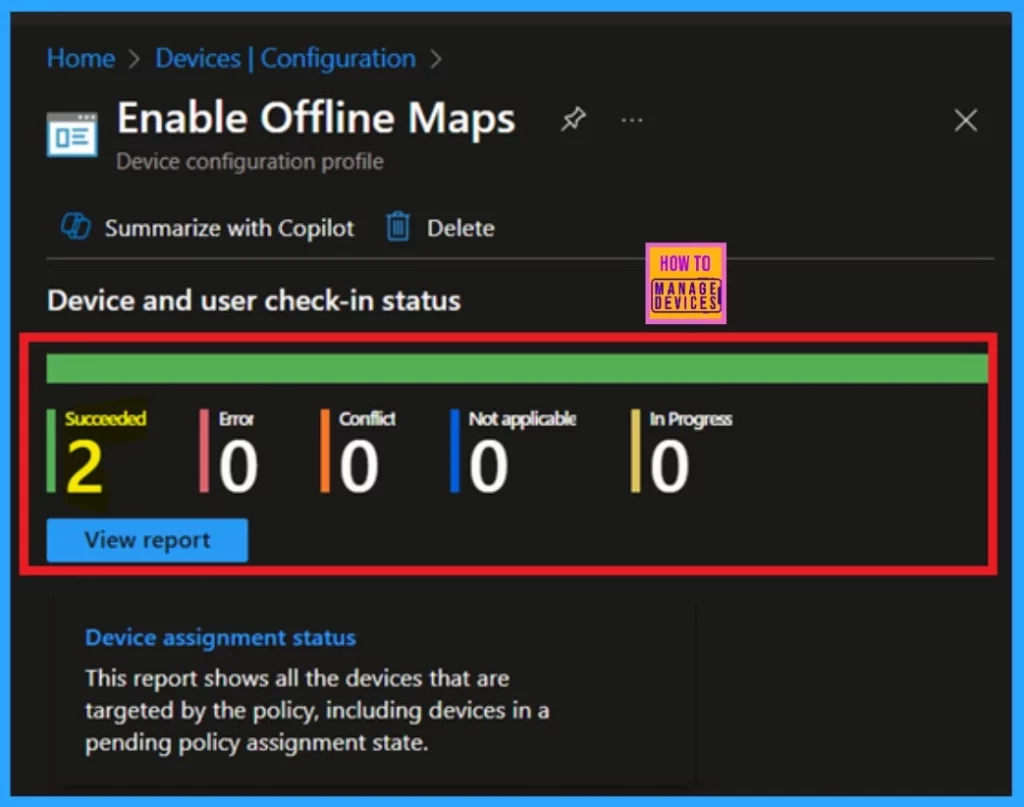
Monitoring status is very important. It helps you determine whether your policy has been created successfully. If any errors or conflicts occur, you can check the monitoring status to identify the problem. For get the Monitoring Status, navigate through device > configuration, and there is a search option available. You can find the map policy that you created.
- Simply click on the Map policy to get an overview of the monitoring status, which will be available 8 hours after the policy creation.
Client Side Verification
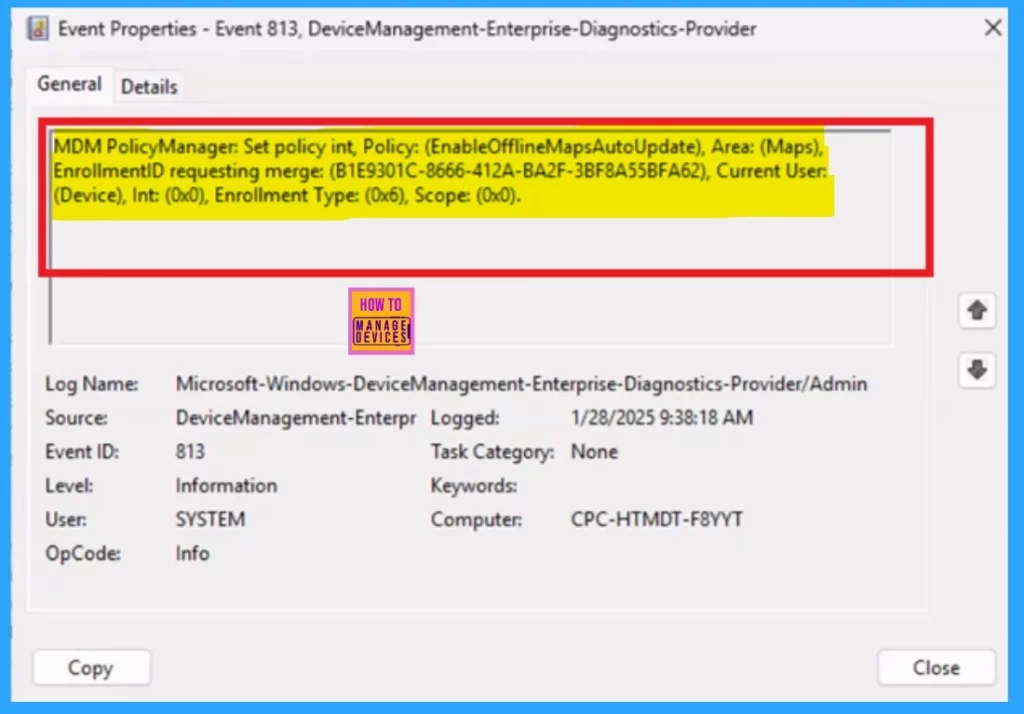
To check the Client Side verification, use the Event Viewer.For that Open Event Viewer and navigate to Application and Service Logs > Microsoft > Windows. Then Select Device Management Enterprise Diagnostics Provider. After that Click on Admin to see the list of events. Also Apply the following filters such as:
- Set the time range to Last Hour.
- Set the event level to Information.
- Look for the successful Event ID for the EnableOfflineMapsAutoUpdate
- Policy, which is 813.
| Policy Details |
|---|
| MDM PolicyManager: Set policy int, Policy: (EnableOfflineMapsAutoUpdate), Area: (Maps), EnrollmentID requesting merge: (B1E9301C-8666-412A-BA2F-3BF8A55BFA62), Current User: (Device), Int: (0x0), Enrollment Type: (0x6), Scope: (0x0). |
Need Further Assistance or Have Technical Questions?
Join the LinkedIn Page and Telegram group to get the latest step-by-step guides and news updates. Join our Meetup Page to participate in User group meetings. Also, Join the WhatsApp Community to get the latest news on Microsoft Technologies. We are there on Reddit as well.
Author
Anoop C Nair has been Microsoft MVP from 2015 onwards for 10 consecutive years! He is a Workplace Solution Architect with more than 22+ years of experience in Workplace technologies. He is also a Blogger, Speaker, and leader of the Local User Group Community. His primary focus is on Device Management technologies like SCCM and Intune. He writes about technologies like Intune, SCCM, Windows, Cloud PC, Windows, Entra, Microsoft Security, Career, etc.
